Showing posts with label Austin garden. Show all posts

Tuesday, January 29, 2013

Peak Harvest

Warm breezes from the south.  Humid evenings with the fan blowing in the bedroom.  I linger outside at dusk, enjoying the rare perfectness of the temperature, which is neither hot nor cold, while staring at the climbing pea plants in the fading light.  Because of the sunny days, the peas are blooming, the broccoli and cauliflower are ready all at once, and the leafy greens, just days ago content to live quietly on the ground, suddenly shoot upwards into flowering stalks.


I could be describing summer in the mountains, or in the Northwest, or in New England, but, instead, this is late January in central Texas.  Just a month after the winter solstice, and just this side of our coldest (or, at least, most likely to be cold) time of the year, is the Bizarro Summer, when warm-on-the-heels-of-cold temperatures transform the garden.  If that all sounds a bit too sweet, then rest assured that, blissful as the evening air may be, this rapid transition from quiet-hunkered-down-in-the-cold garden to hellbent-on-reproducing garden is nothing if not totally annoying.

The moral of the late-January heat is always the same.  Don't wait.  Spend out.  Harvest early, harvest often, and don't worry about whether there will be anything left later in the season.

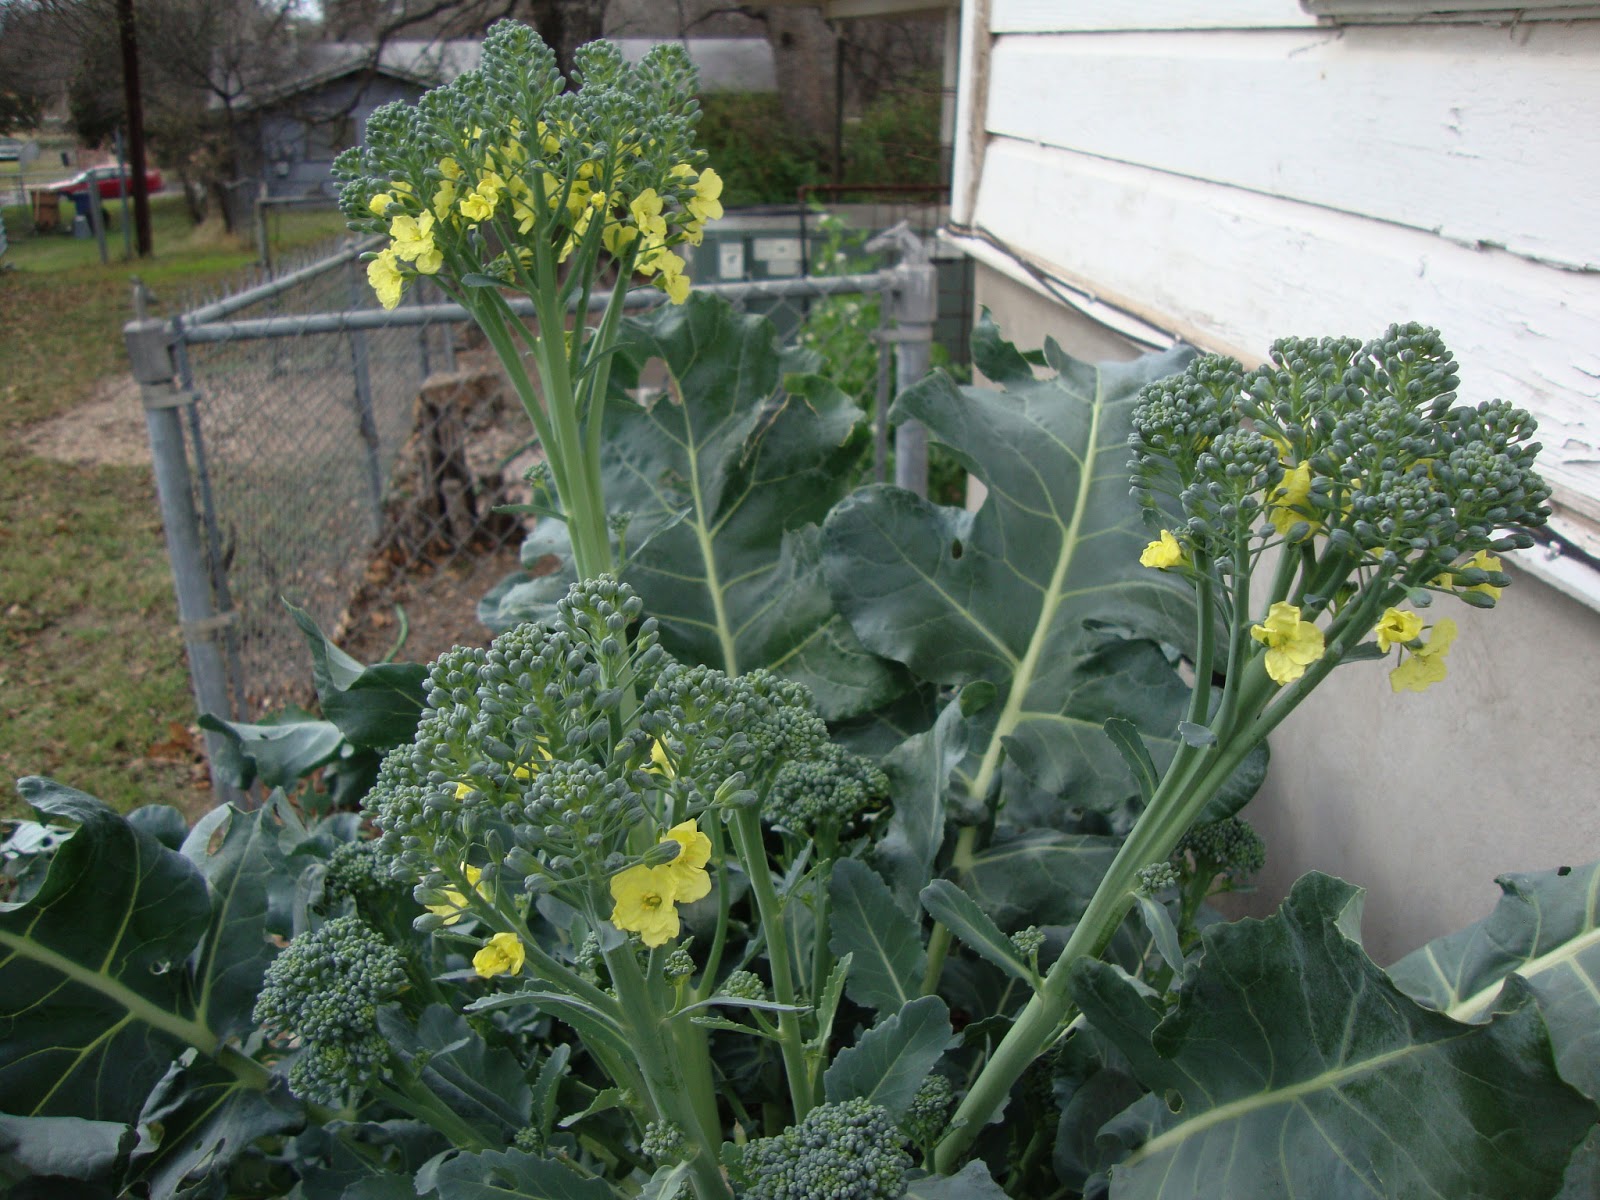
Yet, here I am again, with a row of lettuces growing into spiral towers, broccoli plants flowering yellow along the house, and four carefully-spaced, ginormous tat soi plants developing flower buds.  Not to mention the already-flowering arugula and its neighbor, the about-to-flower mustard.  While there are this-year specific reasons why I have ended up here – the greens were slow to gain size last fall because of a caterpillar population explosion, and the lasting cold weather at the start of the year made it seem that I had more time this year – the truth is that every year there are reasons to put off harvesting, and every year I end up in the same place, with the same row of spiral-towered lettuce plants, thinking the same thing.  Which is that next year I'm going to harvest earlier.  So why don't I?


One reason is that I am a saver.  In other words, I save my dessert for last.  Psychiatrists call it delaying gratification, I call it good to my future self.  Either way it's a sign of maturity and makes me a good worker and a good partner and good citizen of the earth.  If only this were 1850.  Here in modern times, it means that I am Most Likely to Miss Out because I am too busy planning and waiting and anticipating, while everybody else is using the right-turn-only lane to get ahead of the line.  But it's the journey, right?  Anyway, back in the garden, I'm good at preparing the soil for the season, which is important for later, and I've gotten better at thinning the seedlings, which also produces healthier plants later, but I suck at harvesting full-size plants at peak harvest time, which will leave nothing for later.  I mean, what about my future self?  And what if this moment now isn't quite yet the exact peak harvest time?

And that is the other reason that I struggle with peak-season harvest.  I want to get it exactly right.  I want to harvest the lettuce plant when it is full size but before it begins to spiral towards the sky.  I want to harvest the head of broccoli when it is as large as it is going to get but before the flower buds begin to swell.  Which is a little bit like playing blackjack with vegetables.  That almost-optimal head of broccoli could grow a bit bigger tomorrow, or it's flowers could swell toward flowering, depending on whether tomorrow morning is cloudy and cool or sunny and warm.  By mid-January, with so many plants in the garden in that almost-optimal state, a week or two of warm temperatures is disastrous, like a run of high cards being dealt into so many already-close-to-21 hands.  Plant after plant after plant crosses the threshold from vegetative into flowering.

So what's a procrastinating, time-limited gardener to do in the Bizarro Summer?

Harvest with abandon.  Those spiral lettuces are still delicious.  In my experience, lettuce doesn't get bitter until it actually flowers, which is coming soon, but isn't here yet, making this the perfect time to harvest bunches of lettuce at once and enjoy huge, sweet garden-lettuce salads.  This is what I will miss in the depths of the real summer.

Let some go.  Unlike the lettuces, the mustards and Asian greens get bitter as soon as they send up their flowering shoots.  A mustard-family plant grows as a rosette, forming its flowering buds on the ground, hidden within the youngest leaves, so that by the time it sends up a flowering stalk, the flowers are ready to go and the plant is fully in flowering mode, already diverting its sugars into the flowering stalk.  It can be tempting to Eat it all!, but I've ruined a few dinners that way.  A few bitter greens are okay, but last week, when I cooked an entire wok full of gone-to-flower bok choy leaves, the result was bitter, chewy, and work to eat – everything that a kid unhappily associates with eating her greens.  That is no way to end the season with greens that have been so delicious.  As much as I hate to loose those plants, once the leaves turn that waxy, greyer shade of green, the plant is lost to the flowers that are about to made.


In the case of my broccoli plants, I don't mind letting the third cuttings, and some of the later second cuttings, flower.  I find it nearly impossible to catch the third cutting stalks before they flower, given that each cutting matures faster than the one before, the third-cutting heads are small, and the bees love the flowers.

Stay ahead instead of fighting for what is already lost.  Or, as business majors say, don't base decisions on sunk costs.  Arugula, bok choy, tat soi, and broccoli are already gone.  Again, it is very tempting to Eat it all!, or to sort through the remaining plants and build creative meals out of the results.  But the spinach in the back garden is at its peak, as is the cilantro in the front.  Both will get in on this flowering trend in February if not harvested now, and I have limited time.  It makes more sense to enjoy spinach salads and cilantro pesto now, and then to move on to beets, chard, and parsley, than to fight with the mustard-family plants now, only to find that I missed out on the peak harvest for the spinach in the meantime.

Plan for next year.  Seriously, next year I'm going to get it right.  Harvest all bok choy by Christmas, all tat soi by New Year's, mustard by mid-January.  Plant more lettuce, and don't save it for later.  Etc.

And remember that this is what I do for fun.  I'd be just as happy to grow flowers for the bees, who are so grateful this time of year.  So why am I so upset when a few of the plants that I intended for food end up flowering instead?  Mustard flowers are actually quite pretty, so I might as well join the bees and enjoy the first sign of spring here in central Texas.


Monday, May 21, 2012

Mulching for (No) Rain

Since naturalizing in central Texas, I have become obsessed with rain – if we will get any, when we will get any, and, if so, how much we will get.  I have also developed a superstition about how to not to screw up our chances for rain.  It started with the simple and annoying observation that, if the rain chances for a given day were in the middle of the road, say 50% chance of thunderstorms, and my plants needed to be watered, the chances for rain would plummet to about 5% the minute that I decided not to water because rain was on the way.  So I learned, in my early years of Austin gardening, that if the soil was dry and the rain chances were anything less than "flash flood warning starting at noon today," I had better water.  Because to be prepared for no rain was the best way to encourage those middling chances of rain.

Using the same logic, the best way to attract a rainy season to town is to be prepared for weeks of heat and drought.  Which means that my job in the early summer, after the tomato, pepper, eggplant, and okra plants of my hot-season garden have established, is to prepare the garden for the onslaught of summer drought.  Because to be prepared for early, baking heat is the best way to bring thunderstorms to May and June, which can be the rainiest months of the year here in Austin, where a "rainy season" can happen at any time of year, for any number of weeks, or can just as easily disappear, at any time, for any number of months.

I prepare for drought by mulching, or covering the garden soil with a thick layer of leaves, stems, or wood chips.  I look forward to mulching day through March and April, during the seed planting, transplanting, daily watering, and weeding, because mulching day is like graduation day for my plants.  After mulching I still love them and care for them, but my role is changed.  If the rains don't come, I water twice a week, in the dark of the night, by turning on a soaker hose and disappearing into the climate-controlled house while a timer runs.  If the rains do come, then I am really not needed in the garden except to harvest fruits, which my plants make all on their own, in the bright light of Texas summer.  So I love the tucked-in and ready-to-take-care-of-itself look that the garden has just after it has been mulched.


The mulching material that I use varies depending on the season, the type of garden bed, and what I have on hand.  For establishing new garden beds, which requires a deep mat of heavy mulch to kill the weeds and limit the unkillable Bermuda grass, so that its greenery is reduced and its roots are easily dig-out-able, I use lawn clippings.  Lawn clippings are ugly and moldy, but, over time, as the layers pile on, they make an effective barrier against weeds that eventually breaks down into compost, improving the future garden soil.  More importantly, the depth and thickness of a mat of lawn clippings ensures that the soil beneath is heavily insulated from the heat and dry of the air above, creating a moist, cozy environment for the bacteria, fungi, and insects of the soil, who in turn are the real creators of that future garden soil.

On my garden pathways and around my perennials, I use cedar mulch.  It's inexpensive and attractive, and I like the smell.  As a big fan of trees being left standing, I do worry about using wood mulches, but as far as I can tell, the cedar mulch made by Austin Wood Recycling is made by shredding cedar (Juniperus ashei) trees that are cleared from overgrown land.  Given that cedar trees are abundant to the point of being invasive in central Texas, I don't mind the idea of those trees being torn down and shredded for mulch, though I do wish they were being torn down to make room for a native grassland instead of a housing development.  In any case, cedar mulch keeps my front-yard garden looking neat around the edges and it is long-lasting.  The only downside to cedar mulch is that it is as attractive to the neighborhood cats as it is to me.  Apparently, if you're a cat, wild or allowed to roam, to whom my street is home, then my garden is the place to shit.  When I lost a couple of baby plants to an over-exuberant feline digger this spring, I began to reconsider: maybe it's time to switch to gravel mulch for the perennial beds.


In the winter, or when I have them, I use fallen leaves.  My backyard produces a good pile of leaves every December, a mix of post oak, cedar elm, and hackberry.  Still, I always think that I could use a lot more leaves, because of which I have a mental map of whose lawns along my usual driving routes have the best mix of leaves and often find myself, around the end of the year, wondering about the contents of other people's yard-waste bags.  I pile the raked leaves around my fall greens, just after they've passed the baby greens stage, or around the broccoli-family transplants after they have established.  I usually save the last raking of the season, the January (or, this year, February) leaf pile, to be used at the end of the hot season, to be the mulch-on-top-of-the-mulch that puts the garden to bed for the hottest months of the year.


My favorite mulch, the mulch that I use for my hot-season vegetable garden, is alfalfa hay.  Alfalfa isn't technically a hay, because alfalfa itself is not a grass but a broad-leafed plant in the Pea Family, but, because it comes in heavy bales and is called "hay" by horse people, I think of it as alfalfa hay.  But the fact that it is not hay is actually quite important to my garden.  The first hay that I tried to use as mulch for my community garden plot, in my first summer as a Texas gardener, was grass hay.  Where I grew up, in western Oregon, grass hay was common stuff, so I was surprised when nobody in Austin had heard of grass hay.  Instead, I was directed to something called "coastal hay," which seemed to be the Texas equivalent of grass hay.  I found the coastal hay to be expensive and crappy compared to the grass hay that I had known, but I put it on my garden anyway.  My plants didn't die that year, but they didn't thrive either, and it took the soil a couple of seasons to get back to what it had been.

During which time I learned a couple of things about hay.  First, it turns out that the Willamette Valley of Oregon is the world center of grass seed production.  Long, rainy, mild springs produce the best grass hay in the world with minimal chemical input.  So my views on hay quality and availability are heavily skewed by memories of hauling in bales of hay from the neighbor's field in June and feeding fine-stemmed, sweet-smelling flakes of grass hay to the horses all winter.  Second, and more importantly, Texas coastal hay is heavily sprayed with broad-leafed herbicides, which are poisonous to garden plants.  The moral of the story is that coastal hay is poison for your garden.

Once I was aware of the perils of using true hay in Texas, I switched to alfalfa, which worked so well that it has become a yearly ritual to go to the farm supply store to buy a couple of bales.  At the end of April, once the okra has been thinned, and the beds have been weeded one final time, and the soaker hoses are in place, I tear apart flakes of alfalfa and stuff handfuls of the scratchy stems between my plants, creating a thick, unbroken layer of mulch.  If I am lucky, thunderstorms follow mulching day, and the heavy rains seal the alfalfa into place like a heavy, woven crust over the garden.  Alfalfa mulch stays in place, through rain or shine, better than any other mulch I have used, and for that alone it is a great mulching material.  But that is just the beginning of its utility.  Alfalfa is also perfect for my hot-season garden in that it lasts all season but, after several months on the soil, breaks down just as readily.  In fact, I have found that if I cover the alfalfa with a layer of leaves as I remove the spent garden plants in August, in effect mulching the mulch, then, when the fall rains come, the alfalfa beneath the leaf mulch will compost quickly, largely disappearing into the soil by the time of fall planting.


When alfalfa breaks down into the soil, it feeds the soil.  This is true of all mulches – except for gravel mulch, of course, unless you think in geologic time – they eventually break down and add organic matter and nutrition to the soil.  But, while shredded wood can actually rob the soil, temporarily, of nutrients, and dead leaves add mainly micronutrients and humic acid to the soil, alfalfa is high in nitrogen, which is a primary soil nutrient needed by plants.  In fact, "alfalfa meal" is often one of the first ingredients in organic fertilizers, providing the nitrogen part of the N-P-K kick. And that is the real reason, aside from the satisfaction of heaving a bale of hay, that I love to use alfalfa to mulch my summer garden.  Every time I buy a bale of alfalfa, I feel clever knowing that this year's mulch is also next year's fertilizer.

Here is the final secret about mulching that the rain gods don't need to know:  To mulch is also to prepare the garden for a rainy summer.  Just as a thick layer of mulch protects the soil from evaporation, it also protects the soil from flooding.  In the midst of a downpour, water reaches the garden bed more gently, only after flowing around and through the many layers of leaves and stems that make up the mulch, so the soil beneath is much less likely to be carried away.  Plus, mulch reduces splashing, so that the undersides of the leaves of my eggplant, tomato, pepper, okra, and basil plants don't get coated in mud during a storm.  Because of this, the plants are less prone to the fungal diseases that ride around in mud splashes, and they stay cleaner.


So every season I mulch, in preparation for heat and drought, but also in hopes of a rainy season.  I mulch to protect the soil this season, to improve the soil next season, and to feed the soil the season after next.  I mulch because no other garden practice is so cheap and easy, with so many benefits to the soil.  The soil that is the basis of this entire operation.

Friday, February 17, 2012

Sink Wife

The only part of my house that is clean right now is the kitchen sink.  Hair-and-lint balls are piling up in the corners and behind doors, bike tire trails from the front door to the kitchen crisscross wet-leaf trails from the back door, and the microscopic life forms of the bathroom are reaching visible colony sizes.  But the stainless steel kitchen sink, the place where all the greens get double washed, is spotless, shiny even, the well-maintained hub of the household.


Which is no surprise given that, lately, I feel like I live at that sink, constantly standing over it as I cut and tear leaves from their stems, bathe greens in a sink full of water, and move greens from the water to the strainer then back to a fresh bath of water then finally to the spinner for drying.  Or I'm washing the bulky dishes, like salad-mixing bowls and food processor parts, that inevitably follow salad making or greens cooking.  Basically, in these cloudy days of early spring, I'm feeling like a sink wife, a woman whose sink-related chores are never-ending and largely unseen, without which the steady gallop of greens consumption, so necessary if we're going to make this leap from fall to spring garden in about a month, would come to a standstill.  Forward progress is at stake here.

It amazes me how tedious forward progress, lived at the daily level, really is.  For instance, I want to grow some of my own produce in my own yard.  Which is a lovely goal, and one that is very clear in its idea phase – I want to grow greens! – and at fruition – This spinach salad is so delicious!  Even most of the obvious in-between steps, like selecting the seeds, planting the seeds, thinning the seedlings, and weeding the garden, are things that I look forward to doing, side effects from the original produce-growing goal that really are part of the reason that I want to be growing greens in the first place, because I like spending time in the garden.  But then the repetitive tasks sneak in, like processing the greens.


Greens – lettuces, spinach, chard, beet greens, Asian greens, mustard, kale, etc – are dirty.  Not dirty in a gross or bad way, but literally dirty: coated in garden soil, which is splashed on their leaves every time it rains, carrying pieces of mulch, and host to caterpillars, beetles, and aphids.  And, while baby greens are edible as whole leaves, mature greens have large leaves that need to be torn or cut into smaller pieces and from which the woody, central veins need to be removed.  This is the work of the sink wife, taking a bucketful of muddy, nearing-shrub-size plants and transforming them into a bowlful of greens that are ready to be cooked or coated in salad dressing.  Cut, toss stem in compost, tear, toss greens in sink.  Repeat about 137 times.  Slosh greens in water to loosen dirt, transfer to strainer, drain and clean the sink, and repeat.  Repeat.  To repeat is the tedious part of the growing-produce goal, and it is in the midst of the repeat, as I stare out the kitchen window and shift my weight from one leg to the other, that the emotions of the sink wife arise.  The feelings of being trapped in a never-ending process, the sense of being unappreciated for all this effort, and the fear that the work that I am doing is not valuable.

Valuable to whom?  This is a problem that I have, a problem common to many women and a few caretaker men, having been raised by mothers who told us that we could do anything that we wanted while showing us how to silently anticipate the needs of everybody around us.  As their mothers did before them.  I want my work, my time, to be valuable to somebody else, and I have trouble spending my time in ways that are simply valuable to me.  Still, I don't think that the fears of the sink wife are just about value.  I think they run deeper.

To the issue that has been all consuming for me lately: time.  How I spend my time.  The sink wife is the part of me that fears that I am wasting my time standing over the sink, stripping cilantro leaves from their stems to make pesto, or tearing apart lettuce and spinach leaves to make a salad mix, or cutting thick veins from huge mustard leaves to cook into a curry.  The sink wife is the part of me that fears that the whole process, the whole growing-greens project that I have chosen to do, is a waste of time.  That I have made the wrong choice.  That I am doing the wrong thing.

The sink wife arises in the midst of the tedious, repetitive work because that is where I am least distracted by doing.  When I'm in the garden, I'm enjoying being outside too much to question it, and by the time that I am cooking, I'm either busy chopping onions or I'm close enough to the finish that I can see, or smell, the upcoming meal.  But in the midst of the slow, repetitive detail work, the fears beneath, that I am not doing it right, that I am making the wrong choices, they come bubbling up through the sink full of leaves to greet the silence.  I have time to think and wonder and question, so here come the questions:  Am I doing the right thing?  Am I doing it right, this life?

A better question to ask might be, How am I doing it?  Am I enjoying this quiet time in front of the sink, surrounded by the abundance of greens that I have grown, separating leaves from stems into a spotless sink while listening to ManĂ¡ and daydreaming, or am I worrying about whether I am doing the right thing?


Friday, February 3, 2012

Ten Pound Cauliflower

It would seem to be in bad taste, as a gardener, to rank the relative preciousness of the vegetables in my fall garden, something like ranking the handsomeness of the half dozen or so cats that call our backyard their home away from home, when, really, each is perfect in its own way, and, seriously, the only one kitty who really matters (just ask her) is our Benji.  But then came the cauliflowers, each a one-time harvest, each in a bright, new-to-me color, and each with a lengthier ripening time than the last, and they just seemed to demand exactly that – a ranking.  So, with my apologies to the many wonderfully nutritious greens in the front yard that have been waiting patiently for their harvest days as the spoiled nursery transplants on the south side of the house get all the attention, I present, for cool season 2011-2012, the Top Ten Moments in Cruciferous Abundance.

10.  The third broccoli plant of the season to reach harvest size was the Premium Crop.  The Premium Crop produced a medium-sized head that I harvested on December 13, which was 63 days after transplanting.  The Premium Crop, like the two earlier broccoli plants before it, had the good fortune of producing its broccoli head in what turned out to be (at least so far, knock on wood) the coolest part of this mild winter.  Because of which, the Premium Crop reached harvest size slowly, and I managed to harvest it before it showed any signs of being past its prime.  I cooked the Premium Crop into a broccoli-cheddar soup.

Premium Crop Broccoli

9.  By the time the fourth broccoli plant of the season, the Marathon Broccoli, was ready to harvest, we were enjoying an unseasonably (even for Austin) warm January, which meant that I found myself in a sudden state of broccoli abundance, with main heads of the later plants and side heads of the earlier plants all reaching harvest size at once.  I harvested the Marathon Broccoli on January 6, 87 days after transplanting.  I made the Marathon Broccoli into a salad that wasn't very successful because I blanched the broccoli to make the salad, and it just didn't hold up to even a couple of minutes of cooking the way that cauliflower does.  The salad tasted good but the texture was not great, so I'll be sticking to cauliflower salads for the time being.

Marathon Broccoli

8.  This was the first year that I was able to grow broccoli and cauliflower in a full-sun location.  Last year I grew them in the shady backyard and, years before that, my community garden plot was partially shaded.  As a result of the sunny location, almost all of the main broccoli heads were larger than any I had grown before.  But it was the broccoli side shoot production that really amazed me this year, turning what I thought was a single-harvest event into a two-month-long broccoli season.  The Packman Broccoli started the broccoli season with the first main head on November 28, then followed with several ready-to-harvest side shoots by the first week in January.  The combined size of the "side" shoots far exceeded the size of the original main head, explaining why some gardeners advise harvesting the central stalk early to encourage side shoot growth.  Given the lack of side shoots in my broccoli-grown-in-the-shade history, I thought those people were crazy, but the Packman showed me how huge a second harvest can be.  Side shoot harvest continued until January 26, when I harvested the side shoots of the Premium Crop and Marathon broccoli plants, officially closing out the broccoli season.

Packman Broccoli Side Shoots

Premium Crop and Marathon Side Shoots

7.  The last broccoli plant to produce its central head was the Arcadia Broccoli, which I harvested on January 13, a full 94 days after transplanting.  It was a large, dense broccoli head but I'm not sure about its flavor because I gave it to some friends.  The exceptional quality of the Arcadia Broccoli was its long time to harvest, given that so many times I pick out variety of broccoli transplants, only to have them all reach harvest size in the same week.  So, in the land of warm winters and fast broccoli growth, it is nice to know of Arcadia and its slower-growing ways.

Arcadia Broccoli

6.  The first cauliflower of the season to emerge from within its leaves and, once visible, quickly grow to harvest size, was the white Snow Crown cauliflower.  I cooked the white cauliflower into a cauliflower curry.

5.  I planted three heads of cabbage this year but lost one to an omnivorous neighborhood mammal on a health kick.  I harvested the Fast Vantage Cabbage on January 20, or 97 days after transplanting into the front yard garden.  Sliced and cooked into a stir fry with tempeh and black bean sauce, the Fast Vantage was sweet and tender, making me wonder why cabbage has such a bland reputation.  Fresh cabbage is wonderful and takes a long, cool season to grow, making it something of a delicacy here in Texas where the hot season is reliably long and the cool season is anything but reliable.  And, as any gardener knows, the omnivorous neighborhood mammals only eat the best, and the rarest, that a garden has to offer.

Fast Vantage Cabbage

4.  The biggest broccoli head of the season was produced by the Blue Wind Broccoli, which I harvested on December 6 and baked into a Broccoli Cheese Pie.  The Blue Wind Broccoli also went on to grow large side shoots that made their way into another large batch of broccoli cheddar soup on January 11, making the Blue Wind the most productive of the broccoli plants this season.

Blue Wind Broccoli Side Shoots

3.  The purple Graffiti Cauliflower reached harvest size at the same time as the yellow cauliflower, in the middle week of January, which, for this season, was the absolute peak of cruciferous abundance.  Between January 11 and 20, I harvested the several broccoli side shoots (filling the bowl in the photo above), the Arcadia broccoli, two cauliflower, and a cabbage.  And that's not counting all the cruciferous greens, like mustard and kale and Asian greens, reaching maturity in the front yard garden at the same time.  Needless to say, if there were an LD50 for cruciferous vegetables, I would now be able to report on it.  Between the yellow and the purple cauliflower, I thought that the yellow one was going to reach its harvest day a bit sooner, but one day I walked around the house to find that the entire purple cauliflower plant had wilted.  So I harvested the Graffiti Cauliflower on January 15, which was 96 days after transplanting, and revived it by placing its stem into water.

Graffiti Cauliflower

I used the purple cauliflower to make a magenta-colored cauliflower salad.  I know, cauliflower salad sounds about as appetizing as dormitory food.  But last winter I discovered a recipe for Italian-Style Cauliflower Salad in the The Victory Garden Cookbook, an old-school gardener's guide to what to do with all of those vegetables, and since then cauliflower salad has been one of my take-to-work-for-lunch staples.  The salad combines cauliflower, blanched for three minutes to mellow the raw cauliflower edge, with olives, capers, and a lemon-garlic-olive oil dressing.  I usually add a can of garbanzo beans and a chopped hunk of feta cheese to make the salad more substantial.  Before cooking the purple cauliflower, I read that adding vinegar to the water helps the cauliflower to retain its color (and the anthocyanin nutrition associated with it) during cooking.  Given that Austin water is fairly basic, I added a generous half cup of vinegar to the boiling water that I used to blanch the cauliflower, which remained purple but took on a bit more of a pink-purple, or magenta, shade in the water.


2.  The Cheddar Cauliflower was ready to harvest on January 17, or 98 days after transplanting, but I didn't harvest it until January 20, and it used those few extra sunny days on the plant to grow into the Ten Pound Cauliflower.  Now, to be honest, we don't have a scale, so I don't know for sure what the Cheddar Cauliflower weighed at harvest time.  I just know that it was ginormous and far heavier than our eight-pound cat.  Seriously.  I decided to bake it, in the style of macaroni-and-cheese, simply substituting the cauliflower for pasta.  But all that cauliflower didn't fit in the three-quart baking dish, so that day I also had an improvised cauliflower-mayo-and-whatever's-in-the-fridge salad for lunch, before the baked cauliflower for dinner.  Like I said, it was a week of cruciferous abundance.  About that baked cauliflower... it tasted awfully good but that much cauliflower, even though I blanched it before baking, released a whole lot of water during cooking, so the dish didn't look appetizing, more like a not-yet-pureed soup than a baked dish.  I'll have to work on that.

Cheddar Cauliflower

At harvest time, with kitty and cabbage for scale

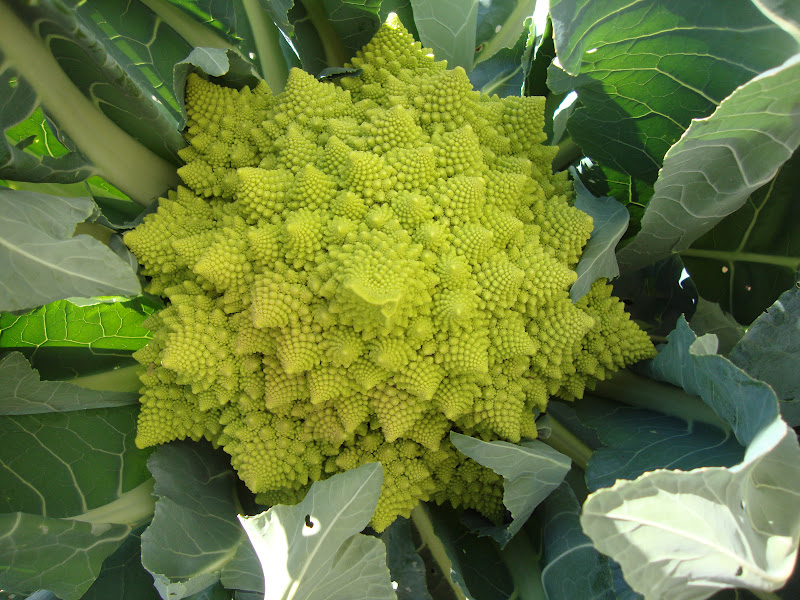
1.  The Veronica Romanesco Cauliflower, being both the last of the cauliflowers to reach harvest size – on January 29, a full 110 days after transplanting – and the coolest-looking vegetable that I have ever grown, inspired this whole list.  It was the Romanesco that put the whole season into a line, leading from the earliest broccoli, to all those unexpected broccoli side shoots, to the cauliflowers in bright colors, and finally to the apex of the season, the bright yellow-green Romanesco cauliflower with its whorled florets.  The Romanesco was so crazy, built looking that I didn't want to cut it into pieces because it felt too much like I was ruining mother nature's personal art project.  But as Lee said, You might as well cut it up now that you've cut it off the plant.  So I carefully disassembled the Romanesco cauliflower, leaving as many florets as I could intact and marveling over how each floret really was a miniature version of the whole head.  In fact, considered individually, each floret looked like a miniature, yet to-scale, version of a magical mountain where gnomes, the type that might nurse a wandering Snow White back to health, might live.  And, in case of doubts, I was quite sober as I was thinking all of this, drinking my morning chai as I made the final Italian-Style Cauliflower Salad of the season, this time adding pasta and Parmesan cheese (instead of garbanzo beans and feta) to create a couple of satisfying meals.  With the crunch of cauliflower, a taste in between broccoli and cauliflower, and its fractal good looks, Romanesco cauliflower is now on my list of favorite vegetables.

Veronica Romanesco Cauliflower

Italian-Style Cauliflower Salad
Adapted from The Victory Garden Cookbook

1 large head of cauliflower
1 cup pimento-stuffed green olives, sliced (or black olives)
2 tablespoons capers
1 (15 ounce) can of garbanzo beans, drained and rinsed
4 ounces feta cheese, crumbled
1 or 2 cloves garlic, crushed
2 tablespoons lemon juice
1/2 cup extra virgin olive oil
1 teaspoon sea salt
freshly ground black pepper

[OR, instead of the garbanzo beans and feta cheese, substitute:
1/2 pound pasta, cooked according to package, rinsed, and cooled
1 cup grated Parmesan cheese]

Disassemble the cauliflower and chop into bite-size pieces.  Soak the cauliflower pieces in water to remove dirt or bugs, then rinse.  Blanch the cauliflower pieces in boiling, salted water for three minutes, then remove immediately, drain, and shock in ice water to cool.  Drain the cauliflower pieces.

In a large bowl, combine the olives, capers, garbanzo beans and feta cheese (or pasta and Parmesan cheese), and cauliflower pieces.  In a small bowl, whisk together the garlic, lemon juice, olive oil, sea salt, and pepper.  Pour the dressing over the cauliflower mixture and stir well to combine.  Refrigerate and serve cold or room temperature.


Thursday, December 15, 2011

Worthy of Broccoli

Broccoli is just too easy – easy to plant, easy to grow, easy to harvest, and immediately ready to chop up and cook.  Broccoli straight out of the garden is always delicious, a once-a-year treat, yet I always fell a little bit sad after I cut the head off a broccoli plant, leaving the plant decapitated and empty-looking, because, aside from a few tiny side heads that may or may not ripen, that is it for that plant.  Harvesting greens is an ongoing process of continual thinning, and harvesting summer fruits, like tomatoes, peppers, and okra, is a season lasting a few weeks to a few months, but harvesting broccoli is a one-time gig.  I look forward to it, and then it is over.

Usually, it is the wait for broccoli that, at least psychologically, extends the season, but my broccoli grew so quickly this year that I didn't get a chance to anticipate the upcoming harvest.  And this was despite the fact that I planted broccoli transplants a few weeks later than usual this year, on October 11.  I planted the baby broccoli into the raised bed along the south side of the house, where the hot sun of October (technically, a summer month in 2011) created greenhouse-like conditions.  The baby plants struggled with the heat for about a week, and then they began growing in earnest.  Within two weeks of planting, they had doubled in size, and by early November, having already grown together into a mass of greenery, they were growing so fast that I every day they seemed bigger than they had been the day before.

The day after planting (October 12)

Established and growing (October 27)

Bigger every day (November 6)

By mid November, the plants were so gigantic that I began joking that I wouldn't be surprised if a baby t-rex crawled out from under their leaves.  Then we had some good rain and I came down with my second head cold of the month and spent my free time sleeping, blowing my nose, and studying the color of my mucus.  Every other day I decided that I had a sinus infection and would call the doctor first thing tomorrow, and every other day I decided that, actually, I was getting better.  Eventually I was back to my just-a-slight-mold-allergy-because-I-live-in-Austin self and realized that I ought to walk around the house and check on those huge broccoli plants.

Full-grown broccoli plants (November 26)

Given their late planting date, I wasn't expecting ripe broccoli until January.  But there they were, at the end of November, forming huge flower heads.  The first broccoli to ripen was the Packman Broccoli, which produced a medium-sized, dark-green head with uniformly large flower buds.  I harvested the Packman on November 28, which was 48 days after transplanting.   Immediately after harvesting, I washed, chopped, and sautĂ©ed the broccoli in olive oil.  Eaten with just a sprinkling of nutritional yeast, salt, and pepper, the broccoli was tender and delicious.  Lee also noticed that it was sweeter tasting than store-bought broccoli, lacking the aftertaste of broccoli that has been refrigerated.

Packman Broccoli

The next broccoli in the queue to be harvested was obviously the Blue Wind Broccoli, which was forming a huge, dense head of broccoli flowers.  The weather cooled down – I finally turned our heat on due to consistently cooler nights – so I had a few days to watch the huge broccoli head before harvesting.  And, though the Packman broccoli had been delicious, I was feeling disappointed, as I am prone to being with broccoli, about how quickly it was gone.  So as I watched the Blue Wind grow bigger, I thought about how I could make more of an event of its harvest, how I could cook it into something worthy of such a huge, beautiful, one-time-and-then-gone broccoli head.

I harvested the Blue Wind Broccoli on December 6, which was 56 days after transplanting.  The broccoli head that it produced was enormous, with a dense center of smaller, lighter flower buds.  I tried, unsuccessfully, to get a picture that really documented how big this head of broccoli was.  Lee and I tried to get Benji to sit next to the broccoli but she loudly reminded us that kitties don't do wet and quickly fled the scene.  I also tried to get a picture of the head of broccoli with a ruler nearby for scale, but the angles just weren't right.  I'll just say this:  it was the biggest head of broccoli that I've ever grown, easily the equivalent of a rubber-banded bunch of broccoli from the grocery store.

Blue Wind Broccoli

I baked the huge broccoli into a Broccoli Cheese Pie because that seemed like the greatest honor that I could bestow upon a vegetable, to make it into several memorable, looking-forward-to-it meals.  I didn't have a recipe so I went by what I knew about cooking broccoli and potatoes and cheese sauces and poured it all into a pie crust.  My recipe is below, and the pie was delicious, but I will warn that it was also soupy when warm.  This is a problem that I have with savory pies, and I've come to the conclusion that this is why savory pies are usually made and sold in the single-serving "pot pie" size, so that the soupy, saucy insides are contained.  My fruit pies, aided by natural pectins and a bit of flour, usually solidify enough after baking (and cooling a bit) that I can cut out a slice without the filling from the adjoining pieces running out, but with this Broccoli Cheese Pie, once one slice was removed, the cheesy filling from the rest of the pie pooled in that empty space.  Maybe that is just the way it is with savory pies, or maybe I used too much sauce or not enough flour to thicken the sauce.  In any case, the pie was, as Lee put it, so good that he wanted to crawl inside of it.  We split the last third of the pie on a cold evening with a strong imperial stout, with Benji curled up in my lap.  In our family of three, there is no greater event in which a vegetable can hope to play a starring role.


Broccoli Cheese Pie

For the crust:
3 cups flour
12 tablespoons cold butter, unsalted
1 teaspoon salt (omit if butter is salted)
approx. 1/2 cup (+ 2 to 4 tablespoons) cold water

For the filling:
4 medium-sized organic potatoes
1 huge head of broccoli (or one bunch from the store)
2 tablespoons olive oil
1 large onion, chopped
6-8 cloves garlic, minced

For the sauce:
4 tablespoons butter
4 tablespoons flour
1 cup vegetable stock
1 cup whole milk (or 1/2 cup milk + 1/2 cup half & half)
10 oz sharp cheddar, grated
fresh cracked back pepper

Preheat the oven to 375˚ F.

The pie crust recipe that I use for all pies, sweet or savory, is from The New Moosewood Cookbook by Mollie Katzen.  It's a simple recipe that makes plenty of dough and rarely gives me any trouble.  I also think it's delicious.  But, obviously, if you have a preferred pie crust recipe, you can use that.  You will need to make enough for a double crust, bottom and top.

To make the dough, measure the flour and salt into a medium bowl and stir.  Cut the butter into chunks and add to the flour.  Using a pastry cutter or two forks, mix the butter into the flour until the butter chunks are no bigger than small pebbles.  (You can do this step in a food processor in a few pulses, which saves time and work, though then you have to clean the food processor parts.)  Add the cold water to the flour and butter mixture a little at a time, mixing the dough well with your hands after each addition.  Keep adding cold water until the dough is able to hold together.  In my experience, this usually takes 2 to 4 tablespoons of cold water in addition to the half cup in the recipe, but the exact amount of water needed each time I make crust depends on the ambient humidity (seriously!), so I have to go by feel.  Press the dough into one big ball.   Cut the dough in half using a knife.  Press each half of dough into a round, flat circle (about 6 inches in diameter by 1/2 inch deep) and wrap each round in saran wrap.  Place the dough rounds in the refrigerator.

Scrub the potatoes and chop into chunks.  Steam or boil the potatoes until they are tender, which takes about 20 minutes.  Drain the potatoes and set aside in a large bowl.

Wash the broccoli.  Discard any tough parts of the stem and slice tender parts of the stem.  Cut the head of the broccoli into bite-size florets.  Set aside.

Heat the olive oil in a large skillet over medium-high heat.  Add the onion and sautĂ©, stirring periodically, until the onion is translucent, about 5 minutes.  Add the garlic and cook another minute or two, stirring frequently.  Add the chopped broccoli, stir, and cover the skillet so that the broccoli will steam.  As the broccoli cooks, stir occasionally and add water as needed to keep the onion-garlic-broccoli mixture from burning.  When the broccoli is bright green and tender, remove from the heat, season with black pepper, and add the mixture to the bowl with the potatoes.

In a medium pot, melt 4 tablespoons of butter.  Whisk 4 tablespoons of flour into the butter until it is a uniform paste.  Add the vegetable stock.  If it is hot (I use the liquid from steaming the potatoes to make the stock), the stock will thicken immediately.  Add the milk and continue to whisk until the sauce thickens.  Turn down the heat and stir in the cheese a little at a time.  Turn off the heat and season with black pepper.  Pour the cheese sauce over the potato-broccoli-onion mixture and stir to combine.  The pie filling is now ready.

Flour your counter.  Retrieve one dough circle from the refrigerator and unwrap it.  Lightly flour each side of the dough circle and lightly flour the rolling pin.  Use the rolling pin to flatten the dough into a pie crust.  Keep rolling until the dough is an inch or two bigger than you pie pan.  Carefully fold the crust in half and lift it into the pie pan.  Unfold the crust and loosely fit it to the pie pan.  Retrieve the other dough circle from the refrigerator and repeat the process of making a second pie crust.  Carefully fold the second crust in half and cut small vent holes into the crust.  Pour the pie filling into the bottom crust and level it out.  Place the top crust over the filling, unfold it, and pinch the two crusts together around the edges of the pie.

Bake the pie at 375˚ F  for 45 minutes, or until the crust is lightly browned and the filling is bubbling.

Friday, October 28, 2011

In Pursuit of the Proper Cold Front

September 5 & 15.  The first two cold fronts of the season didn't do shit.  Pardon the attitude and the language, but, after months of blinding hot temperatures, highs in the 90's with no chance of rain felt more like a distant memory of summers past, or a reminder of how we defined hot as balls back before 2011, than of any real reprieve from the ongoing hottest and longest summer on record.  You have to be in Austin, in September, having spent the summer here, to understand how anyone could refer to 95˚ F as a "cold front," and this year I just wasn't buying it.  Cold front, my ass.

Being surrounded by plant death didn't help my state of mind.  My gardens were abandoned, emptied of even the drought-hardy pepper plants, the ones that I had expected to survive through the summer and until the first freeze, shortly after the Stage 2 Water Restrictions notice arrived in the mail.  Only two of the perennial herbs that I planted in the spring, the rosemary and the sage, still grew in the front-yard garden, while the thyme, oregano, and tarragon plants had turned brown and crispy about the same time I gave up on the okra.  In the strip next to the driveway, about a third of the drought-hardy perennials, "water-wise" plants specifically selected for their ability to withstand oven-like summer conditions, had been lost to the heat of July and August, while their remaining neighbors were hanging on for their lives, barely any bigger in size than when I planted them in the spring.  Around my house and my neighbors' houses, long-established shrubs – those anonymous boxy ones that have been there forever, surviving countless Austin summers without care or watering or anyone's second thought – were also turning unhealthy shades of yellow and brown, killed by this summer.  And all around town, trees of all ages were dropping their leaves early, turning unhealthy shades of fall early, or simply dying where they had grown for so many years.


By the last week in September, when the high temperatures had climbed, yet again, back into the 105˚ F range, my mood as a gardener had sunk from, This is my month off, to, I don't know if I can start again.  I was depressed.  I knew that, according to the calender, it was time to plant broccoli, cauliflower, and cabbage transplants, but I couldn't imagine planting anything young and green into such a cruel world.  I also knew that, in just a couple of weeks, it would be time to plant seeds, for lettuces, fall greens, and winter herbs.  It was my favorite time of the year, time to prepare my garden beds for fresh new rows of seeds and to get lost in the seed section of the plant store.  But instead of feeling the delicious anticipation of the cooler growing season, I was stuck in the inertia of the never-ending summer.

September 30.  The third cold front of the season knocked the temperatures out of the triple-digit range for good.  I woke early (for me) on the second morning in October and headed out for a walk.  As I walked down the street, I was struck by how quiet the neighborhood was in the late morning.  So quiet that I could hear my own footsteps crunching through the dry grass of the greenbelt.  I looked back at my neighborhood and realized that, for the first time in months, all of our air-conditioning units were silent at once.  I didn't appreciate how loud all those engines were until they were finally silent and, relieved by the absence of that constant humming, my shoulders dropped a few millimeters away from my ears.

The next day I began watering my gardens and compost pile.  To garden again, to trust the universe of central Texas to provide life-sustaining conditions once again, still seemed like a foolish idea.   Yet I was beginning to grasp the fact that, while the heat would eventually break and give way to the cool season, we weren't necessarily going to get the ground-soaking rains that my garden needed to start growing again.  So I began hand-watering the beds that I planned to plant, hoping that some of the moisture would soak through the thick layers of summer mulch and bring the soil back to life.  I was also hoping that the water would loosen the soil enough to be worked.  Later that week, I dug the remaining taproots of okra, eggplant, and fennel plants out of the garden beds and, in doing so, discovered that beautiful, dark, crumbly garden soil was still there, hiding under layers of leaf and alfalfa mulch.


For me, nothing is more motivating than turning, and smelling and feeling, a shovelful of fertile soil.  Within hours I had a garden plan and a list for the nursery and I was ready to begin again.  Rain was predicted for the weekend and, though I wasn't expecting the universe to pull though with an actual rainstorm, I figured that it was time to buy those broccoli, cauliflower, and cabbage transplants.  At the garden center, I found trays of leggy baby plants, grown to be ready for planting a few weeks earlier.  I carefully selected fifteen plants – 5 broccoli, 4 cauliflower, 3 cabbages, 2 collards, and 1 Brussels sprout – of fifteen varieties, plus a few herbs to replace those that I had lost, plus a handful of seed packets.  As soon as the next front arrived, I was ready to plant.

October 8 & 9.  The fourth cold front brought ground-soaking rains.  Finally.  I wish I could say that I enjoyed the rainstorm, because I do love a thunderstorm, but I spent most of it indoors, without windows, at work.  And I was grumpy that weekend because I knew that I was scheduled to work ten of the next eleven days, at exactly the time that it was finally time to plant my fall garden.  So, to my coworkers, I apologize, because I simply didn't have the patience to deal with another pallet of unexpected, unordered cereal in the midst of the usual backstore chaos, knowing that on the other side of the back doors, outside, it was finally raining.

After the storm passed, I transplanted the baby broccoli, cauliflower, cabbages, and Brussels sprout into the garden along the south wall of the house.  Almost immediately, temperatures rebounded into the high 80's, which felt downright summer-like along that south wall.  My baby plants wilted in the midday sun and the smallest of the cabbages, the one with only two sturdy leaves, threatened to perish in the heat.  I hand watered the transplants every day and told them to hang on for cooler days.


The fourth front might not have brought much cooler temperatures but the fact that it did arrive in the midst of a ground-soaking rain was a huge relief.  Without rain, fall planting feels calender-driven and robotic: I will plant now because it is time.  With rain, it feels like time to plant, which may not seem like much of a difference except that, for me, gardening is most rewarding when I am working with the plants and the seasons: put the right plant in the right place at the right time.  So, after a summer of fighting against heat and drought, a good fall rain was like hitting the reset button for me.  The ground was soft, the rain lilies were blooming, and it was time to plant.  I transplanted the baby collards and herb plants, a thyme, an oregano, and a horehound plant, into the front-yard garden.  Then I dug compost into each bed and carved rows for planting seeds – lettuces, Asian greens, mustard, two varieties of kale, fenugreek, carrots, cilantro, and parsley.

Inside the house, the cold front triggered the fall-cleaning urge in Lee, who spent most of the following week moving everything out of his jam room, cleaning and resealing the floor, and rearranging his furniture.  I am usually the one to disrupt the household with my projects, but this time it was Benji (the cat) and I who tiptoed around musical equipment, giving each other distressed looks (and she did some yelling), before finding a safe place to curl up on the front-room couch.  It was interesting to be on the observing end of a clean-out, feeling that manic energy instead of generating it.  I understand better now why Benji and Lee scurry to the back of the house with anxious looks in their eyes when I decide that it's way past time to scrub the kitchen floor.  By the weekend, the clean-out energy, and various clutter that we didn't need anymore, had reached the sidewalk in time for our area's Bulk Trash pickup.  The clean-out vibe quickly spread down the street, and, within hours, every household on the block seemed to be getting rid of its least-comfortable chair.  After dark, Bulk Trash pickup turned into a your-trash-is-my-treasure swap, so that most of the piles of discarded stuff disappeared before pickup even began.

October 18.  The fifth cold front of the season was windy and dry.  It brought the cooler days needed for my broccoli-family transplants to establish and begin growing in earnest in their protected, south-facing garden.  In a matter of days they seemed to double in size, growing from spindly transplants into wide- and many-leaved plants whose leaves were almost touching.  In the front-yard, windy conditions dried the top of the soil where I had just planted so many rows of seeds and I feared that I would have lower germination rates as a result.  But I kept watering every day and soon thick rows of seedlings began to break through the soil.  The Asian greens and mustards were the first to germinate, of course, followed by the kales, fenugreek, and lettuces.


Later that week, I planted seeds in the shady backyard garden.  This year I only planted seeds of plants that were able to tolerate the shady conditions last year, red-leaved lettuces, chard, beet greens, and spinach.  It was a risk, planting my favorites of all the fall greens, the beet greens, chard, and spinach, in the less-than-ideal, shady conditions of the backyard.  But it may give me a later, spring season of greens to harvest from the backyard long after the fast-growing mustard-family greens have gone to seed in the front yard.

On Saturday Lee and I dusted off our state park pass and headed to McKinney Falls for a hike around the Onion Creek loop trail.  The creek was low, barely flowing over the falls, but actually held far more water than I expected.  And the trail was lined with the new, green leaves and round, pink flowers of Wood-Sorrel, a fall wildflower that had been encouraged out of dormancy by the rains two weekends earlier.  Slowly but surely, the lives that went on hold back in May, hidden inside our houses or waiting in dormancy underground, were starting up again.

Wood-Sorrel (Oxalis drummondii)

October 27.  With the sixth front of the season, the hot season has finally given way to the cool season.  Not that we won't see warm temperatures again soon – the cool season in Austin is defined by change, not by cold weather, which is always temporary here.  But the north wind tonight is actually cold, and standing outside in it made me cold, as in uncomfortably cold, a state that I haven't experienced in months.  The truth is, I don't like being cold.  And that is when I know that the seasons have changed in Austin, that we are officially in the cool season, when I feel cold enough to remember how much I don't like being cold and to just as quickly realize that, given how much I have been complaining about the heat all summer, I'd better get ready to embrace the season of change.  

Wednesday, September 7, 2011

Tomato Review

The tomato season is long past, and it was quick this year.  Before the weather cools and my thoughts turn to fall greens, I want to record how each of my tomato plants did this year.  I grew seven tomato plants this summer.  I bought all of them as baby plants in four-inch pots at the Natural Gardener on March 17, 2011, and planted them the next day.  They established immediately and grew quickly, doubling in size in a week and growing into full-size plants by the first of May.  I began picking ripe grape tomatoes on May 14, though it was another couple of weeks before the full-sized tomatoes began to turn yellow or red.  At the peak of this year's tomato harvest, around the time of the summer solstice (June 21), tomatoes of all sizes filled the kitchen table.  At the end of June, tomato production slowed as quickly as it had accelerated at the beginning of the month, so that by the second week in July, I was only picking a few, small tomatoes every day or two.  I stopped watering the plants in mid July and pulled them out on July 25.

Peak tomato harvest, June 21, 2011

Which all sounds very precise, with specific dates, thanks to the date stamps within all those digital photos.  While the dates will help me plan for tomato seasons to come, the reality of my tomato garden was far from precise or scientific, so, before I proceed with observations on how each tomato plant fared this year, I should make a few disclaimers.

First, this was my first summer to grow tomatoes in the raised-bed garden along the south wall of the house.  I built the retaining wall to make the garden this spring, amended the existing rocky soil with mulch, compost, and manure, and immediately planted.  The soil was very young and non-uniform, with intermixed patches of existing soil, composted organic matter, and raw or partially-decomposed organic matter.  Which was fairly normal for one of my gardens, especially in the first season or two, and it seemed to be fine for the young tomato plants, given how quickly they grew.  In addition to soil differences, each tomato plant had a different location along the south-wall garden, which was built to level out the slope along the side of the house.  As a result, the tomatoes at the west end of the garden grew in the deeper part of the raised bed than those in the east end.  The two tomatoes on the end of the row had fewer neighbors than the others and had better access to light but also had to deal with drier conditions on the edges of the garden.  Altogether, each tomato plant had its own microclimate in terms of soil depth, soil composition, light access, competition, and water retention.  All of which is, again, completely normal in any garden, but means that my results are simply that, my results, observations from my garden this year, not scientific conclusions about the performance of these tomatoes.


Next, I should mention that something ate my tomatoes this year.  Tomato loss is an expected part of growing tomatoes in Austin, where birds snack on the tomatoes, ruining whole fruit with a single peck, and healthy populations of fruit-eating mammals, including mice, rats, squirrels, opossums, skunks, and raccoons, have learned where all the best gardens are.  But, when I say that something ate my tomatoes this year, I mean that something ate my tomato plants, as in the tops of the green vines, which is something that I had never seen before and had never heard of.  I mean, who eats tomato plants?  My best theory was that the very fat green caterpillar that I found snacking on a green tomato was the culprit, or one of them.  I don't know where the caterpillar came from or what it would have turned into, had it lived long enough to metamorphosize into its adult form.  I moved it to my compost pile to fatten up a bit more before it was surely eaten by one of the animals – the fat lizard, the birds, the squirrels, or the roof rats – that frequent the compost pile.  In any case, the tomato-plant eating didn't seem to affect the tomato harvest, as it mostly happened after the plants had set fruit.


Finally, this summer was hot and dry.  By some measures, the hottest summer on record.  Given that warm temperatures at night slow down and eventually stop tomato plants from setting fruit, a hot summer means a short tomato season.  In early June, the plants were covered with green tomatoes, but, as those tomatoes ripened, new green tomatoes did not appear in their place, so that by early July, the plants were almost bare of fruit.  By early July, the plants were also weary from lack of water.  I watered the plants deeply twice a week throughout the season, but all my watering couldn't make up for the lack of summer thunderstorms this year.  We only had two thunderstorms in the tomato season, one in mid May and one in mid June.  Every so many years, we have a rainy June with cooler temperatures, and then the tomato season is longer and more productive, favoring later-season tomatoes adapted to humid, milder conditions.  This year was the opposite, a short, fast, hot and dry season favoring early-season tomatoes and those adapted to hotter, drier conditions.

The first tomato to ripen this year was the Cupid Hybrid grape tomato.  I started eating grape tomatoes off the plant in mid May and soon was picking a small handful of tomatoes every day or two.  The plant continued to produce until mid July, though by then the fruits were smaller and infrequent.  We ate most of the grape tomatoes as snacks straight out of the bowl.  The tomatoes were sweet-tart with good texture and a slight pear shape.

Cupid Hybrid Grape Tomatoes

I think of the Porter tomato as the Texas workhorse tomato.  When I was new to gardening in Texas, a veteran gardener suggested that I get a Porter tomato at the upcoming plant sale because, regardless of how hot, or dry, or flooded, the upcoming summer proved to be, the Porter would produce.  She was right, the Porter tomato always produces, whether we're in stage four of the drought or recovering from the 100-year floods, so every year I try to find a Porter tomato plant to grow.  True to form, the Porter tomato won this season's endurance test.  It began making ripe tomatoes just after the grape-tomato plant in May and continued to make tomatoes into July.  In fact, the Porter tomato outlasted me this year – despite the hot temperatures and drought, the Porter was still setting fruit in early July when I decided that the tomato season was over.  When I pulled the plants, the Porter was by far the biggest plant in the row, having taken over its own space and also much of its neighbors' space.

Porter Tomatoes

So, if the Porter tomato is such a reliable workhorse, why grow any other tomato in Texas?  First, Porter tomatoes are small, "plum tomato" size, and therefore are not ideal for cooking because, in order to make a tomato sauce or soup from a batch of Porters, all of them would have to be skinned, which would be tedious.  Given their size, Porters are best eaten fresh, sliced in half or quartered into salads.  The other thing about Porters is that their taste is inconsistent.  I've heard that they are one of those tomatoes that are loved by some and hated by others, but I think the truth may be more that they are sweet and delicious some years but bland and mushy other years.  Porters are like the insurance policy of tomato growing in Texas – if June is rainy and cool, the Porters won't be great but also won't be much needed, but if it's 107˚ F with oven-like high-pressure winds, the Porters will still be producing garden-fresh tomatoes while all those fancy heirlooms fail to thrive.  This year, this brutally hot and dry year, the Porters were sweet and delicious.  For most of June and into July, I packed Porter tomato and basil pasta salads for lunch, then sliced Porters onto crackers to eat with cheddar and beer as a midnight snack when I got home from work.


Of the full-size tomatoes, the JD's Special C-Tex Early Black was the most productive in the early part of the season, in mid June.  JD's Special made lots of round, medium-sized tomatoes with dark-green shoulders on deep red fruits.  The tomatoes were very prone to cracking – most of the fruits had splits running down the tomato from the stem end or all the way around the tomato, circling the stem.  The cracking was worse following the June rainstorm, leading me to think that the JD's Special C-Tex Early Black tomato, specially bred for our central Texas summers (hence the "C-Tex"), is another tomato, like the Porter, meant to keep us in tomatoes even in the drought years.  I tried to minimize the impact of the cracking by harvesting the fruit early, as soon as the bottom part of the tomato was red, before the cracks were big enough to attract ants.  The ripening tomatoes were then prone to shriveling (around the cracks) and softening, even when the tomatoes were still green at the stem end.

JD's Special C-Tex Early Black Tomatoes

Because of the cracking, the JD's Special tomatoes were mainly cooking tomatoes this summer.  They were the tomatoes that I wanted to use first to prevent spoilage, the tomatoes that needed to have parts cut out of them, the tomatoes that became the basis for tomato sauce and tomato soup.  They did not peel easily, both due to the cracks and the under-ripeness of the top parts of many of the fruits at the time of cooking, but the dark red flesh cooked down into wonderful tomato goodness.  I feel a bit unfair defining those tomatoes so strongly on their splits given that the tomatoes themselves were actually quite juicy and delicious.  And given that the tomato sauce that I made from JD's Special tomatoes, along with a mix of other tomatoes from the garden, was one of the highlights of the tomato season.


The Sunmaster hybrid tomato, another tomato that was specifically bred for hot summers, was the most productive plant in the later part of this year's short season, in late June.  When the other tomatoes were slowing down, the Sunmaster had its heyday, producing many shiny, orange-red, medium-sized tomatoes.  In fact, of the tomatoes that I grew this year, the Sunmaster tomatoes were most like those in the produce section at the grocery store:  bright, shiny, red fruits, free of splits or blemishes, and long lasting.  By early July, the rows of to-be-eaten tomatoes on our kitchen table had dwindled down from a colorful mix of red, golden, striped, and dark-fruited tomatoes to just the red tomatoes, just the long-lasting Sunmasters.  The Sunmasters were also easy to peel, making them ideal for cooking or canning.  Compared to the other full-sized tomatoes, though, the Sunmasters had a fairly bland taste, which was not surprising given their uniformity and longevity.  A garden-fresh Sunmaster was still miles better, in flavor and especially in texture, than those grocery-store tomatoes.  Overall, given the productivity of the Sunmaster in the hot summer, its beautiful, long-lasting fruits, and the rich flavor of the tomatoes after being cooked down into sauce or soup or okra masala, I will be looking for a Sunmaster plant next spring.

Sunmaster Hybrid Tomatoes

The Cherokee Purple, an heirloom tomato known for producing delicious, dark-colored tomatoes, was the least productive tomato in my garden this year.  In fact, I only harvested three or four tomatoes from that plant.  They were delicious, with the fluted shape that I associate with the best tomatoes, but apparently Cherokee Purples don't like the oven-like heat of a hot year in central Texas because the plant was by far the smallest in the row.

Cherokee Purple Tomatoes

The Old German, an heirloom tomato with huge, striped, yellow-orange-red tomatoes, was my favorite tomato of the season.  Sauces and soups and pasta salads aside, the real joy of the tomato season is simple tomato and toast:  toasted, buttered bread with fresh, sliced tomatoes sprinkled with sea salt, nutritional yeast, and a drizzle of olive or flax oil.  Yum.  It's a snack that I enjoy year-round, even with greenhouse tomatoes, but with fresh tomatoes it is especially good, and with heirloom tomatoes, the kind that have seeds throughout their juicy flesh instead of in compartments like the modern hybrid tomatoes, it is dreamy.  This year, the clear tomato-and-toast winner, the tomato with the sweetest, juiciest flavor, was the Old German.  The easy-to-peel fruits of the Old German were also beautiful in cross-section, with golden, orange, peach, and red flesh that cooked down into a sweet, bright-orange sauce.  The Old German plant was not as productive as JD's Special or the Sunmaster in terms of number of fruits, but each tomato was heavy, so that each time I picked an Old German tomato I carried it carefully into the kitchen with that feeling of gardener pride, look what I grew!  The large fruits, which had splits from the stem end, were prone to molding once they had ripened on the kitchen table, so they needed to be eaten fairly quickly.  But needing to eat the Old German tomatoes was a lovely problem to have for a few weeks and, considering the heat of the summer, I was impressed that the Old German kept making its big tomatoes into the first week of July.

Old German Tomatoes

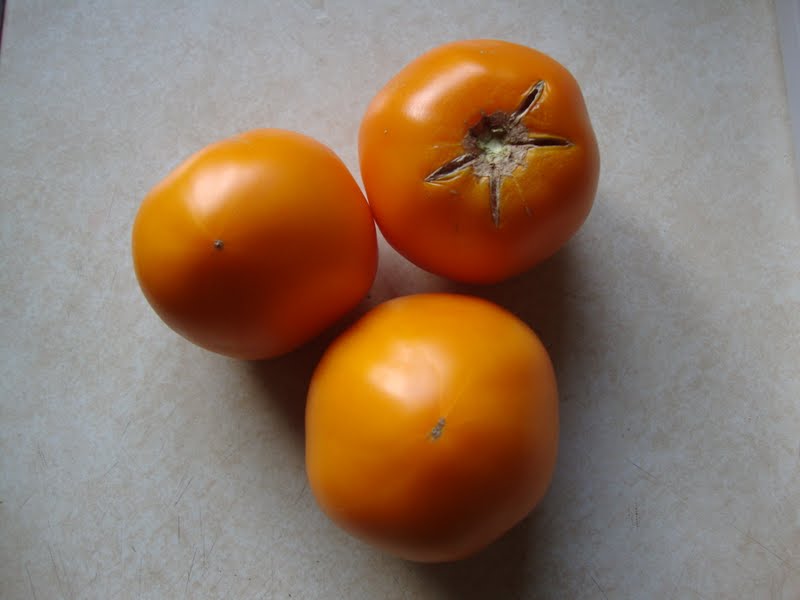
Finally, there was that yellow tomato on the end of the row.  This year I was clever and stuck the plant labels in the ground next to each tomato cage so that, in June, when harvesting, I would know what each plant was.  All of the tags survived except for that tomato on the west end of the row, the tomato planted in the biggest tomato cage in the deepest part of the new garden.  I was sure that it was a Celebrity tomato, a solid workhorse of a producer that grows huge, sprawling vines and makes many fruits, until I realized that its fruits were turning golden instead of red.  Then I looked for the tag and it was long gone, probably lost during mulching.  The plant itself was not sprawling but relatively contained considering its spot on the end of the row.  The plant also was the first of the row to wilt, possibly because it was on the west end of the row, with the harshest afternoon sun exposure.  In any case, it wasn't a Celebrity tomato.  Its fruits were medium-sized, heart-shaped, and golden yellow, and I would guess that it was an "early" tomato, given that, among the full-sized tomatoes, it was the first plant to make ripe tomatoes and the first plant, aside from the non-productive Cherokee Purple, to give up production in the name of heat.  The golden fruits were sweet, with the low-acid flavor of yellow tomatoes, very easy to peel, and had beautiful golden flesh.  Given what I observed about the plant, I think it was a Jubilee tomato plant, but I can't be sure that I didn't grow one-of-a-kind, accidental hybrid that snuck into somebody's greenhouse, given how readily tomatoes of unknown parentage sprout from my compost.

Jubilee (?) Tomatoes